
Tuesday, July 31, 2007
Monday, July 30, 2007
Parents and childs - Group objects together
In order to move many objects in Blender as a single object you can select all and [Ctrl][P]. Then they are grouped together.
Sunday, July 29, 2007
Animation - Pose Mode
Select the bones and go into the Pose Mode.

In Pose Mode the assigned bones will appear blue, not yellow.
Now you can move them, pose them, with [G] or [R].
Increase the frames with the Up-Arrow and Lock the movement with [I] and select LocRot.
The result:

In Pose Mode the assigned bones will appear blue, not yellow.
Now you can move them, pose them, with [G] or [R].
Increase the frames with the Up-Arrow and Lock the movement with [I] and select LocRot.
The result:
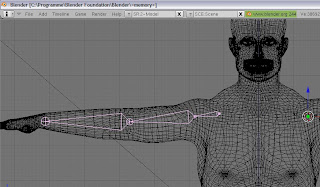
Adding Bones to the old fat man
In order to make it move, bones are necessary.
[Space] [Add] [Armature]
Enable the "Draw Name Modus" in the Armature Box:
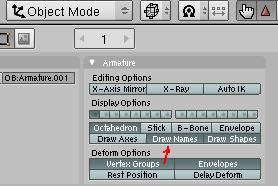
In the Edit-Mode [Tab] rename each bone in the Armature Bones Box:
Connecting the bones to the Mesh:
Now, how to connect the bones to the mesh, in order to bend the object aligned to the bones?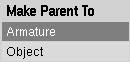
These are the steps:
Goto in Object mode [Tab], select the body and with [Shift] and [RMC] (Right mouse click) select one of the bone-armature.
"Make Parent To"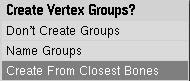
Then [Ctrl] [P] and select Armature...
and select "Create from Closest Bones".
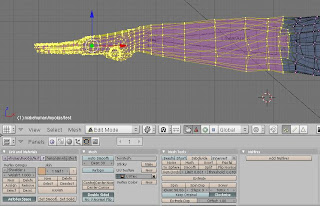
Select the body and go into Edit Mode.
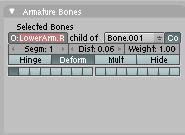
With the Box-Selection-Tool [B] select the lower-Arm-right and in the "Link Material" Box select the Vertex-Group "LowerArm.R" as previously named bone. Click on "Select" and the bone is assigned to the vertex-group.
At this moment you will not be able to move the bone, you need to go into the "Pose Mode".
[Space] [Add] [Armature]

Enable the "Draw Name Modus" in the Armature Box:

In the Edit-Mode [Tab] rename each bone in the Armature Bones Box:

Connecting the bones to the Mesh:
Now, how to connect the bones to the mesh, in order to bend the object aligned to the bones?

These are the steps:
Goto in Object mode [Tab], select the body and with [Shift] and [RMC] (Right mouse click) select one of the bone-armature.
"Make Parent To"

Then [Ctrl] [P] and select Armature...
and select "Create from Closest Bones".
Select the body and go into Edit Mode.
With the Box-Selection-Tool [B] select the lower-Arm-right and in the "Link Material" Box select the Vertex-Group "LowerArm.R" as previously named bone. Click on "Select" and the bone is assigned to the vertex-group.
At this moment you will not be able to move the bone, you need to go into the "Pose Mode".

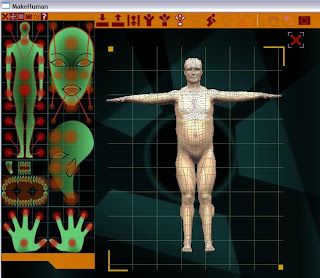
MakeHuman Object export to Blender
I tried to create an human in Blender, but it's really hard work.
Therefore I downloaded the "MakeHuman" Tool, it's freeware.
After some modification on its bodyweight (making him fat), I exported it as a "Wavefront" Object.
In Blender you can import Wavefront Objects.
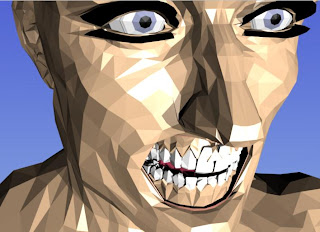
Rendered in Blender:

The cool think is, its possible to modify some "alien" - Settings, deformations ...

Modelling a Taliban Head
Currently I'm modelling a "Taliban Head". Simple, not much details. Cartoon-Like.

A basis for the head I use a UVSphere with 16x16 and I add one a subsurf.
The eyelids are simple spheres cut in two pieces.


A basis for the head I use a UVSphere with 16x16 and I add one a subsurf.
The eyelids are simple spheres cut in two pieces.
Saturday, July 28, 2007
My first animation with Blender
A quit simple animation with Blender 2.44.
Many thanks to "lllstrikesmember2" for his pretty cool tutorials on creating a 3D gingerbread man and animating it.
I followed his tutorials on YouTube:
Part 1: Creating a simple gingerbread
Part 2: Decorating (colors, add more details)
Part 3: Adding Bones to the gingerbread
Part 4: Animation
Many thanks to "lllstrikesmember2" for his pretty cool tutorials on creating a 3D gingerbread man and animating it.
I followed his tutorials on YouTube:
Part 1: Creating a simple gingerbread
Part 2: Decorating (colors, add more details)
Part 3: Adding Bones to the gingerbread
Part 4: Animation
Subscribe to:
Comments (Atom)
