Sunday, August 12, 2007

Radiosity or not radiosity !?

No radiosity, 3 spots, rendertime less then 7 seconds:


With radiosity, 3 spots, 1 light emitting sources in interior of the vehicle, 300 iterations, rendertime 19 secons:


How does the light source look like for radiosity?


It is only a cube with the setting Emitting on 1 in shaders.


And whats this? Why is this video rotated 180 degree?
Sometimes YouTube doesn't recognise raw-Avi???

Thursday, August 9, 2007

Photo composition - scorpion

How to create a photo composition with Blender?

The important point is the shadow cast on the floor. Take a look on the picture:


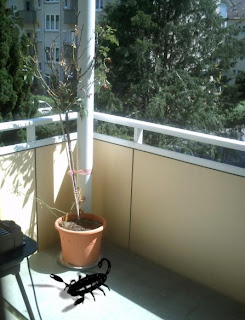
Well the composition is not perfect, but it requires not much time for modeling and composition, only a few simple steps.

First I created a simple scorpion model, with a little sculpt-mode and face-extraction.


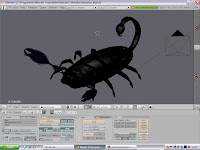
Then I placed it on a plane.
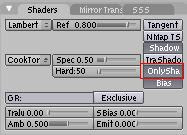
Note: Select the option "OnlyShadow" for the plane! You will need only the shadow on the plane, not the plane itself. Therefore this option will make the plane invisible, but the shadow will be rendered on the photo.

Then select in the menu "View" a background image.


Align the camera in order that the model will be placed on the floor.


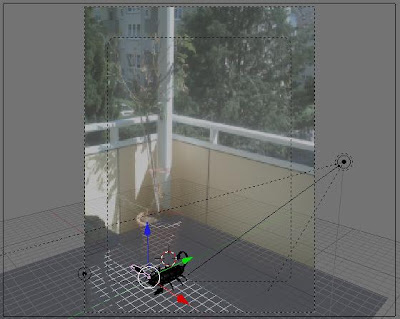
Last step: The spotlight. Some experimenting is necessary ;)

Wednesday, August 1, 2007

Sculpting in Blender


There many tutorials on the web.
Sculpting Mode is new in Blender. A powerful tool for modeling complex objects.

Links:
Well, this is the result after some experimenting with the settings.
For adding mass to the shape the brush needs to be big enough, else the adding requires to much time. A good size for beginning is the default of 50 and a strength of 100.

Some notes on rendering:
If you want to render your sculpture, perhaps you will be surprised of the result.
There will be nothing else then the unchanged box or sphere, nothing more, no sculpture.
The reason is a setting called "Multires-Rendering-Pin". This setting on default will result in a simple box. Increase it to 4 and you will get the best result.

Tuesday, July 31, 2007

Modeling is easy...

It's seems to be easy modeling with Blender, right after learning the most basic "hot keys".

Monday, July 30, 2007

Parents and childs - Group objects together

In order to move many objects in Blender as a single object you can select all and [Ctrl][P]. Then they are grouped together.

Sunday, July 29, 2007

Animation - Pose Mode

Select the bones and go into the Pose Mode.


In Pose Mode the assigned bones will appear blue, not yellow.
Now you can move them, pose them, with [G] or [R].

Increase the frames with the Up-Arrow and Lock the movement with [I] and select LocRot.

The result:

Adding Bones to the old fat man

In order to make it move, bones are necessary.
[Space] [Add] [Armature]


Enable the "Draw Name Modus" in the Armature Box:


In the Edit-Mode [Tab] rename each bone in the Armature Bones Box:


Connecting the bones to the Mesh:
Now, how to connect the bones to the mesh, in order to bend the object aligned to the bones?
These are the steps:
Goto in Object mode [Tab], select the body and with [Shift] and [RMC] (Right mouse click) select one of the bone-armature.
"Make Parent To"
Then [Ctrl] [P] and select Armature...
and select "Create from Closest Bones".

Select the body and go into Edit Mode.
With the Box-Selection-Tool [B] select the lower-Arm-right and in the "Link Material" Box select the Vertex-Group "LowerArm.R" as previously named bone. Click on "Select" and the bone is assigned to the vertex-group.
At this moment you will not be able to move the bone, you need to go into the "Pose Mode".